October 13, 2011

Pumpkin Cream Cheese Bread


ITS FALL!!!!! My favorite time of year!! There is a crispness in the air, the sound of fallen leaves and the warm, cozy scent of hot cider and tea...its the best time of year hands down! So, since it is autumn that means only one thing....time to bake and cook with pumpkin!! There are so many pumpkin recipes out there! So I thought I would begin with a simple and easy one, a pumpkin cream cheese bread! I found this recipe on the evil site that is Pinterest, I seriously get lost on there for hours. This recipe was pinned from Lick the Bowl Good, which is a site I have gotten other recipe off of as well. So let's get this autumn season started!


Pumpkin Cream Cheese Bread
Yields 2 loaves

Filling:

8 oz. package cream cheese, room temperature
1/2 cup granulated sugar
2 large eggs
1 1/2 T flour

Bread:

1 cup toasted pecans or walnuts (optional)
3 1/2 cups all-purpose flour
1 tsp. baking powder
1 tsp. baking soda
3/4 tsp. salt
1 1/2 tsp. ground cinnamon
1/4 tsp. ground nutmeg
4 large eggs
2 cups granulated sugar
1 cup unsalted butter, melted and cooled
15 oz. can pure pumpkin
1/2 cup water
1 1/2 tsp. vanilla

Preheat oven to 350. Butter and flour 2 loaf pans.

For the Filling: Beat the cream cheese until just smooth with a hand mixer, stand mixer or in a food processor. Add the sugar and process until smooth and creamy. Add the eggs, one at a time, processing until just incorporated. Stir in the flour. Set aside.

For the Pumpkin Bread: Sift together flour, baking powder, baking soda, salt, cinnamon and nutmeg in a large bowl and set aside. In another large bowl, whisk together the eggs until well lightly beaten. Whisk in the sugar and melted butter, then stir in pumpkin, water, vanilla and (optional) nuts.

Stir the flour mixture into the pumpkin mixture, being careful not to overmix. A few streaks of flour is fine. Divide the batter in half. Take one half and divide it between two pans. Pour half of the cream cheese mixture into each pan, then top with the remaining half of batter. Smooth the tops and bake for one hour, or until a toothpick inserted comes out clean.

Cool pans on a wire rack for 10 minutes, then turn out and cool loaves to room temperature.


This bread is so moist, and dense with a light pumpkin flavor, it is the perfect fall treat! Not overly sweet and the cream cheese adds a nice smooth texture. With how moist and smooth this bread is, the addition of nuts is a welcomed crunch, and texture.

Now if you'll excuse me I am going to go make a cup of tea and enjoy my bread...bye now!

Eat, Drink and Be Merry....fall is here!!!

-BellaRosa


August 15, 2011

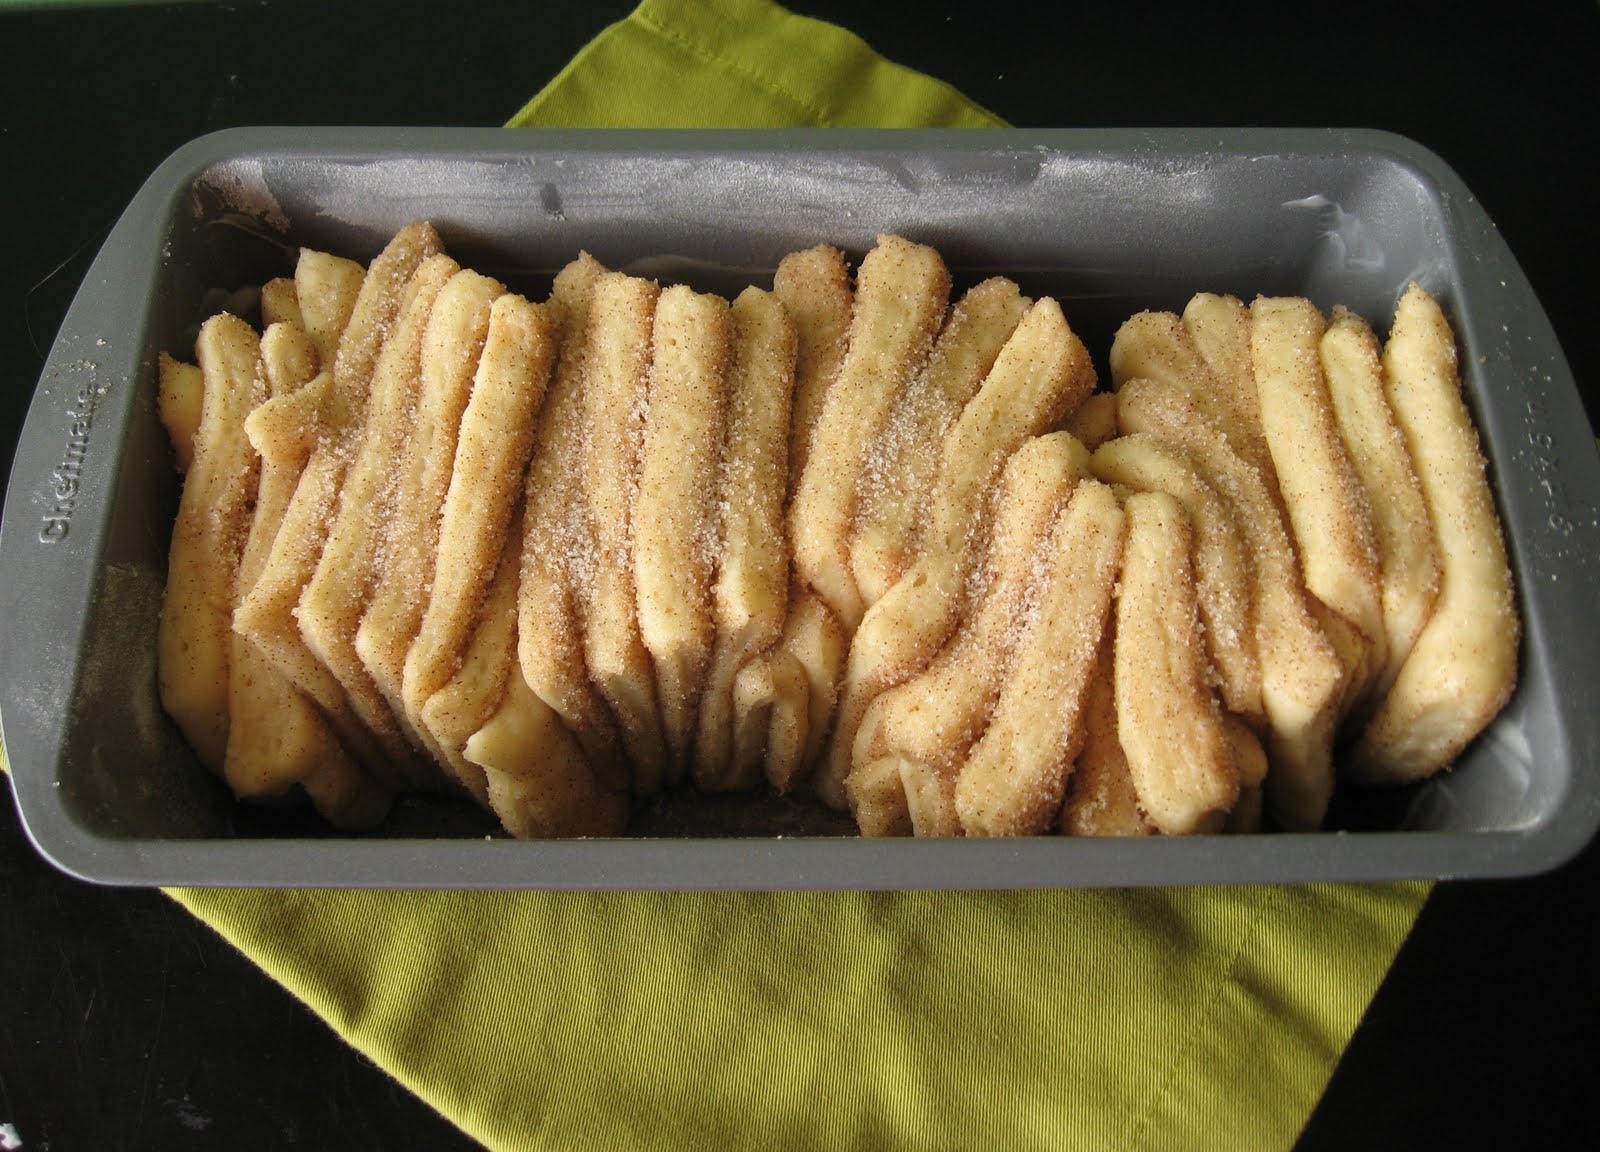
Cinnamon Sugar Pull-Apart Bread


Well, its been quite a while since I have posted anything or updated my blog!! Hopefully I will be doing more updates since I hope to be cooking a lot more since fall is coming. That means soups, stews and chilis are gonna be simmering in my kitchen!

But first I thought we would do something sweet that would be delicious for a nice cool, fall day with a nice hot cup of tea. And I found the perfect recipe for a Cinnamon Sugar Pull-Apart Bread from Zoomy Yummy!

Cinnamon Sugar Pull-Apart Bread

for the dough:

2 3/4 cup all-purpose flour
1/4 cup granulated sugar
2 1/4 tsp. (1 packet) active dry yeast
1/2 tsp. salt
2 large eggs, at room temperature
1/4 cup unsalted butter
1/3 cup milk
1/4 cup water
1 tsp. vanilla

for the filling:

1 cup granulated sugar
2 tsp. ground cinnamon
1/2 tsp. ground nutmeg (optional)
1/4 cup unsalted butter

In a large mixing bowl whisk 2 cups flour, sugar, yeast and salt. Set aside. In a small bowl beat the eggs and set aside. And melt the butter and milk in a small saucepan on medium-low heat. Add the water and vanilla to the butter-milk mixture and slightly stir.

Pour the butter-milk mixture into the dry ingredient and stir together with a spatula. Add the eggs and stir the mixture until eggs are incorporated into the batter. Add the remaining 3/4 cup of flour and stir with spatula for about 2 minutes. Then knead the dough to form a nice ball.

Grease a clean bowl and place the dough ball inside. Cover with a kitchen towel and set in a warm place and let rest until doubled in size, about 1 hour.

Deflate the risen dough and knead about 1 tablespoon of flour into the dough. Place the dough on a lightly floured surface. Roll dough out into a 12 inch high by 20 inches wide rectangle.

Prepare the filling. Melt the butter in a saucepan over medium-low heat. Combine the sugar and cinnamon. Use a pastry brush to spread melted butter across all the dough. Sprinkle with all the cinnamon sugar mixture.

Slice the dough vertically, into 6 equal-sized strips. Stack the strips on top of one another and slice the stacks into 6 equal slices again. You'll have 6 stacks of 6 squares.

Grease and flour a loaf pan. Layer the dough like a flip-book into the loaf pan. Place a kitchen towel on top and let allow to rest for 30-45 minutes.

Before baking and after letting it rest

Bake in a preheated 350 oven for 30 minutes until a dark golden brown.

Remove from oven and let rest for 20-30 minutes. Run a butter knife around the edges of the pan to loosen the bread and invert on to a cooling rack ad then invert again onto your serving plate.

Look at the caramelly goo on the bottom! Yum!

Not gonna lie...this was a pain my butt to make! Came out great though!! Very delicious and not overly sweet. I didn't use quite all the cinnamon sugar filling cause it just seemed like so much! A whole cup of sugar! Seemed nuts to me to use that much. But it came out really delicious and went great with a cup of Tazo tea! Really looking forward to fall and all the yummy stuff I am gonna make! This is just the beginning!

Eat, Drink and Be Merry!

-BellaRosa

May 23, 2011

Lime & Raspberry Muffins


I don't know why I thought of this flavor combination, but I was out grocery shopping and thought how I wanted to make some muffins and then thought about the combination of lime and raspberry. I didn't even know if there was s recipe out there for lime and raspberry muffins, but I bought the ingredients and then searched for a recipe. I found one from Closet Cooking that looked really good and easy and I already had all the items needed!

Lime & Raspberry Muffins
makes 12 muffins

2 cups flour
2 teaspoons baking powder
1/2 teaspoon salt
1/2 cup butter (room temperature)
3/4 cup white sugar
2 eggs
1 teaspoon vanilla extract
1/4 teaspoon lime zest
1/2 cup milk
1 1/2 cups fresh raspberries
1/4 cup lime juice
1 teaspoon grated lime zest
1/2 cup icing sugar

1. Mix the flour, baking powder and salt in a bowl.
2. Cream the butter and sugar in a large bowl.
3. Beat in the eggs, vanilla extract and lime zest.
4. Mix in the milk.
5. Mix in the dry ingredients.
6. Gently fold in the raspberries.
7. Spoon the mixture in to a greased muffin pan.
8. Bake in a preheated 375F oven until a toothpick inserted into the center comes out clean, about 20-25 minutes.
9. Mix the lime juice and zest with the icing sugar and pour over the muffins.

Original recipe from Closet Cooking

This muffins were...DELICIOUS! I wished there was more of a lime flavor cause the only lime going in the batter itself was 1/4 tsp of lime zest. Also I made my glaze too runny...so there might have been more lime flavor if I had made it thicker so it would have stuck easier to the muffins. Also when I added the glaze I used a baggy cause I wanted a zig-zag effect, but like I said it was too runny so it didn't really add much. But the raspberries are amazing in there and they add a nice mosit-ness to the muffins. These were great for a nice spring time treat in the morning or in the afternoon with some tea!

Definitely try these muffins, they were easy to make and taste great!

Eat, Drink and Be Merry!

-BellaRosa

May 18, 2011

Cookies: Brown Sugar Cookies and Orange Ricotta with Dark Chocolate Drizzle for the Youngblood's Birthday


It was our dear friend John's birthday and he asked his fiance. Just A Girl Baking, not to make him anything, so I said I would make cookies. I love sugar cookies, but I love brown sugar more than white, so I found a recipe for some Brown Sugar Cookies and decided to give those a go. They called for dark brown sugar which I never bought or had before so this was going to be fun! Then I also already had saved, a recipe for some Orange Ricotta Cookies. I have made Lemon Ricotta Cookies before, but these were orange with some dark chocolate drizzled on them, they are super good and easy, a little time consuming, but easy!

Brown Sugar Cookies

3/4 cup unsalted butter, softened
1 1/2 cup dark brown sugar, packed
1/2 cup granulated sugar
1 egg, room temperature
2 T vegetable oil
1 tsp. vanilla
2 cups all-purpose flour
1/2 tsp. baking powder
1/2 tsp. salt

Preheat oven to 375. Line 2 baking sheets with parchment paper and set aside.

Cream together the butter and sugars. Add egg, vegetable oil and vanilla and mix until incorporated.

In another bowl, combine flour, baking powder and salt and mix to combine. Add flour mixture to the wet indgredients and mix together until combined. Dough with be crumbly and moist.

Portion dough into 18 balls, a little bigger than a golf ball, and place on lined baking sheets 2 1/2 to 3 inches apart. Bake for 12-15 minutes for chewy cookies and 16-18 minutes for crispy cookies. Remove from oven and cool on pan for 5 minutes before moving to wire rack to cool completely. Store in air tight container.

Original recipe from Furey and the Feast.

These cookies are amazingly chewy and full of a nice caramel flavor from the dark brown sugar. I really love these cookies! And because you make some rather large cookies you have just enough to cookie to last you a whole cup of tea or coffee! And they get the perfect crackle top and look amazing!

Orange Ricotta Cookies with Dark Chocolate Drizzle

1 1/4 cup all-purpose flour
1/2 tsp. baking powder
1/2 tsp. salt
1/4 cup unsalted butter, softened
1 cup granulated sugar
1 large egg
1 cup ricotta cheese
1 1/2 T fresh orange juice
1/2 orange, zested

Glaze:

3/4 cup powdered sugar
1 1/2 T orange juice
orange zest

1/2 cup dark chocolate, melted

Preheat oven to 375. Line a large baking sheet with parchment paper and set aside.

In a medium bowl combine the flour, baking powder and salt. Whisk until ingredients are combined and set aside.

In a large bowl cream together the butter and sugar. Beat until light and fluffy, about 3 minutes. Add the egg and mix until incorporated. Add the ricotta cheese, orange juice and orange zest. Beat to combine.

Stir in the dry ingredients. Spoon the dough, about 1 T per cookie, on to lined baking sheet. Bake 12-15 minutes, until slightly golden on edges. Remove from oven and let cool on baking sheet for 2 minutes. Transfer to wire rack to cool completely.

To glaze the cookies: combine the powdered sugar and orange juice in a small bowl and whisk until smooth. Spoon about a 1/2 tsp. of glaze onto each cookie and use the back of spoon to gently spread. Let the glaze harden for about 5 minutes. Drizzle cookies with dark chocolate and let the cookies set.

I made a half batch from the original recipe from Two Peas and Their Pod

When I made these it was quite humid here, and even when I took them over to our friend's place it was quite humid and they were left out and they got a little...sweaty. I think the glaze sort of melted off the cookies from under the dark chocolate so they were a little sticky...but otherwise quite good! I love the combination of the light orange flavor and the dark chocolate drizzle. And the drizzle adds a nice snappy texture to the otherwise soft and spongey cookie. I really do enjoy these ricotta cookies and I think either cookie recipe makes a great gift for a loved one!

Eat, Drink and Be Merry!

-BellaRosa

March 17, 2011

Cake Pops *Updated*


I have seen cake pops around on food blogs and on Bakerella and never really thought about making them myself. My Hubsie and I just visited my eldest brother in Chicago and we stopped at a Starbucks and they had them there and it was some sort of "happy hour" so we got free cake pops with our drinks...omg totally yum! So now that I had a cake pop I thought it was time to make them, since really they are quite easy, and St. Patrick's Day is upon us and they seemed like a fun friend-get-together treat. So I tried my hand at making cake pops.

My "Birthday Cake Pop" from Starbucks

Basic Cake Pops
(from Bakerella)

1 box cake mix, made according to directions for a 9X13 cake pan
1 (16 oz.) can frosting
1 lb. package chocolate candy melts
Lollipop sticks
Wax Paper

  1. After cake is cooked and cooled completely, crumble into large bowl.
  2. Mix thoroughly with 1 can frosting. (I use the back of a large spoon, but it may be easier to use fingers to mix together. But, be warned, it will get messy. Also, you may not need the entire can of frosting, so start out by using almost the entire can and add more if you need to.)
  3. Roll mixture into quarter size balls and place on wax paper covered cookie sheet. (Should make 45-50) (Mine made 30 cause I made them bigger.)
  4. Melt chocolate in the microwave per directions on package. (30 sec intervals, stirring in between.)
  5. Dip the tip of your lollipop stick in a little of the melted candy coating and insert into the cake balls. (Insert a little less than halfway.)
  6. Place them in the freezer for a little while to firm up. (About 15-20 minutes)
  7. Once firm, carefully insert the cake ball into the candy coating by holding the lollipop stick and rotating until covered. Once covered remove and softly tap and rotate until the excess chocolate falls off. Don’t tap too hard or the cake ball will fall off, too.
  8. Place in a styrofoam block to dry.
I think the best thing about these cute cake pops, besides them being really yummy, is you can change it up and make whatever kind of cake you want and use different frostings or even flavor the candy melts to taste however you want it to taste. I used a marble cake mix with chocolate frosting, I know the Birthday Cake Pop from Starbucks was yellow cake. So you can make it however you want, with whatever your favorite cake flavor is. I think these would be super cute for a bridal shower or baby shower, make wedding cake pops with white cake and use pretty non-perils on them for decoration, so fun! You can do anything with these!

Check out Bakerella, she makes tons of different shapes and uses all kinds of cake mixes and whatnot. She even has a cookbook about them called Cake Pops!

*UPDATE*

Classy Cake Pops

I made some new cake pops for a get-together with Funfetti cake and Cream Cheese frosting. I used dark chocolate and vanilla flavored candy melts to dip them and some non-perile sprinkles to make them look classy and fun for a party!

Next time you are having a shindig, think about making some cake pops! Your guests will think they are super fun...cause they are!

Eat, Drink and Be Merry!

-BellaRosa

February 2, 2011

Lemon Ricotta Cookies with Lemon Glaze


Since I live in Northeast Ohio there is freezing rain and tons of snow blowing around today, so it seemed a good time to bake some cookies. Especially some cookies with a nice refreshing and uplifting flavor, like lemon. I had half a container of ricotta cheese in the fridge and thought I could work with that so I looked up recipes. I came upon this great cookie recipe and I think you all will enjoy it.

Lemon Ricotta Cookies with Lemon Glaze

1 1/4 cup flour
1/2 teaspoon baking powder
1/2 teaspoon salt
1/2 stick butter, softened
1 cup sugar
1 egg
1/2 container of ricotta cheese
1 1/2 Tablespoons lemon juice
1/2 lemon, zested

Glaze:

3/4 cup powdered sugar
2 Tablespoons lemon juice
1/2 lemon, zested

Preheat oven to 375.

In a small bowl combine the flour, baking powder and salt. Set aside.

In a medium bowl beat together the butter and sugar. Add the egg and beat to combine. Add the ricotta cheese, lemon juice and lemon zest and mix well. Stir in the flour mixture until all is smooth and combined.

Line 2 baking sheets with parchment paper. Spoon the dough, about 2 Tablespoon for each cookie onto the baking sheets. Bake for 10-15 minutes until the edges turn golden brown. Remove from the oven and let cookies rest on baking sheet for 20 minutes.


Glaze:

Combine the powedered sugar, lemone juice and zest in a small bowl and stir until smooth. Spoon about 1/2 tsp. onto each cookie, using the back of the spoon to spread the glaze evenly. Let the glaze harden for 2 hours. Store cookies in a container.

This makes a half batch of the original recipe.

These cookies are wonderful! The have that fresh lemony scent and flavor that is reminiscent of spring and summer...nice for a cold blustery day like today! We need that reminder of warmer weather and outside fun!

They have a great texture and are light and airy. I normally don't like glazes on things, there is something about the powdered sugar...but these are really delicious with or without the glaze. I think I prefer them with it. Its not overly sweet, I think these cookies are just right! Plus I love the little specks of the lemon zest sitting on top of the cookies, looks so fresh and yummy!

I hope you get a chance to makes these cookies, make them for someone you love, they will love you for it! They would be great boxed or bagged up as a treat for a relative or for a good friend.

Eat, Drink and Be Merry....dream of warmer weather and cool breezes

-BellaRosa

January 29, 2011

One-Pan Chicken and Veggies with an Apple Gravy


I haven't had a "dinner post" in quite awhile and I made this one-pan meal the other night and it was truly delicious and needs to be shared! I recieve Rachael Ray emails and newsletters and in one of the latest ones I got it had a one-pan chicken dinner and it looked amazing. I had another recipe from here with chicken and an apple gravy with homemade rice pilaf that I have been wanting to make, or at least the apple gravy part, so I combined the one pot meal with the gravy and it was a nice hearty and satisfying meal with a nice hunk of grainy bread to mop up the yummy gravy.

One-Pan Chicken and Veggies with an Apple Gravy

4 pieces bone-in chicken (2 leg quarters and 2 breasts)
1 small acorn squash
1/2 pound small Yukon gold potatoes, cut in halves
2-3 large carrots, cut into large chunks
1 small onion, quartered
1 large, or 2 small heads garlic, cut in half
salt and pepper
1 tsp. thyme
1 T butter
1 T flour
1/2 cup apple cider
1 cup chicken broth

Preheat oven to 425.

Place all cut up veggies in a roasting pan. Season with salt, pepper and the thyme, drizzle with olive oil and mix together with your hands. Pat the chicken dry with paper towels, and season with salt and pepper. Nestle the chicken into the roasting pan on top of the veggies and roast for 40-50 minutes until juices run clear. Let sit for 10 minutes to cool and to let meat rest.

In a small sauce pan melt 1 T butter. Add in 1 T flour and whisk into a roux. Whisk in the apple cider to avoid lumps. Whisk in chicken broth and bring to a bubble and allow to thicken. Season with salt and pepper and serve over chicken and veggies.

Recipe inspired by Rachael Ray


This dinner was so delicious and easy to make and prepare! I mean, you throw everything in a roasting pan and that's about it. The gravy takes no more than 5 minutes to make and its full of apple flavor and is great with the chicken and veggies and especially good just being dipped in with a piece of hearty bread. So yum! I really think anybody can make this and it would come out fantastic. And you can cater it to your tastes, use whatever hearty vegetables you like and you can make it your own by adding other spices or herbs that you like!

Please excuse my food photos...by the time dinner is ready it is dark outside therefor I have no light to do my photos by. Makes me a sad food blogger...oh well! Please enjoy anyway!

Eat, Drink and Be Merry!

-BellaRosa


January 5, 2011

2011: A New Year

We are 5 days into the new year and for me this New Year came in without a bang, but I really liked that. I feel more relaxed and more calm about this new year and I feel it's going to be a good one!

2010 was a very changing and interesting year. I don't know if I feel as though I, myself, have changed much, but things about my surroundings and other people close in my life have changed, and therefore affected me and brought new experiences to my life. Also over the past year I am grown much closer to some friends and further apart from others. Friendships come and go and you really get to learn who your friends are and who are gonna stick with you for the rest of your life as you grow and change as a person...and I think I really got to discover that over the year of 2010.

This past year I turned 25! That seems like one of those ages that really MEAN something, but overall I just feel like the same little girl. I still act like I am 17 and I am still dealing with real-life adult stuff and it all seems weird and foreign, yet right. I don't know. I think 25 is just one of those ages where you really realize you are an adult and not a kid anymore...


One of the biggest experiences for me was taking our first trip our to California from my brother, Jim's, wedding. It was mine and my husband's first time EVER flying and our first big trip to anywhere, and what a better excuse than to be there for my brother's wedding?! It was an amazing trip full of family, great food and some of the best memories I will keep with me for the rest of my life. I couldn't believe how as a family, we all came together and all flew out for Jim and Joan and how close it made me feel to my family. And now being older, I can really, truly appreciate the time I get to spend with my brothers and being able to go out with them and just hang out and have a good time. Like I said, memories I will cherish forever.

Whole Family together for the Wedding

And to experience all of that with my husband meant the world to me, I love that I was able to share the whole trip and adventure with him.
Hubsie and I at the Golden Gate Bridge!

Another big event was that of my husband's sister changing her entire life and getting divorced, remarried and moving to Germany with our nephew Griffin. It was something that while shocking, was almost, understandable. It was something she needed to do for herself and for her to be happy and live the life she wanted. Also, I got to do my first try at wedding photography so that was sometime new I got to do! I am not normally the one taking pictures of people so it was interesting and harder than it looks!

Rudy and Missy at their wedding

While we obviously miss her dearly, now that she is overseas, we support her and her new husband and all the good things coming to them is well deserved! They are expecting their first baby together which is very exciting, but kinda on the sad side because we won't be able to see them for much longer now because she can't travel while pregnant, and we won't see the baby in person other than over Skype. We try to Skype with her when we can and with the time difference its hard, but we still email and keep in contact with all that is going on.

Missy and Griffin at the airport on their way to Germany

Hubsie and I celebrated 1 year of marriage in 2010 which was crazy! That first year really flew by fast and I couldn't believe our anniversary was already happening! We had a wonderful day of going to the Art Museum and having lunch there and then going out to dinner later that night. It was an amazing day and I it was really truly magical and I just can't believe how fast that year went by!
September 26, 2009

I feel like, for me, 2010 was all about family and experiences. I got to truly realize and appreciate the time I get to spend with my family and I got to do and experience things I didn't think I would have. So all in all, 2010 was a great year and I feel like 2011 will be a good one as well!

Hope everyone had a wonderful 2010 and are looking forward to their 2011!

Bye, Bye 2010! Bring it on 2011!!!!

-BellaRosa

December 17, 2010

2010 Christmas Cookies


This year I made three new cookies for Christmas, two of which I think are total keepers and one that I don't like too much, but you can't win them all. I made some great Chocolate Mint and Dark Chocolate Chip Cookies, Cinnamon Spirals and Orange Cinnamon Biscotti dipped in Dark Chocolate. Yeah...delicious.

The Chocolate cookies are quite delicious. I made some last weekend to make them and get ideas, but I used regular milk chocolate chips, so this time I used Andes Creme de Menthe chips and dark chocolate chips (since I had some leftover from dipping the biscotti). They are mighty delicious and stay chewy when you store them in a plastic baggie rather than a plastic container, I found. And I love some chewy cookies! I found the main recipe here at Food.com and just changed the chips.

Chocolate Mint Dark Chocolate Chip Cookies

I am not a big crispy, hard cookie person, but I am intrigued by making biscotti cause they are pretty easy and kinda fun to make. For some reason when I think Christmas flavors I thought of orange and spice, so I went with an orange and cinnamon biscotti and then decided to doll them up and dip the sides of them in dark chocolate. The orange scent alone, even before taking a bite makes these biscotti delicious. Then you take a bite with the dark chocolate and the orange zest flavor and its a winner. I added some sliced almonds in the dough but I think I should have added more or used bigger pieces. These are really yummy cookies and great for Christmas with a mug of hot cocoa! I found the recipe here at Food.com

Orange Cinnamon Biscotti Dipped in Dark Chocolate

The last cookie I made....were a pain my butt! The dough is bland and crumbly and hard to roll out and then roll into spirals...I don't know. I was expecting a lot from these cookies I guess. A lot more flavor, a lot more easier and fun to make and they just made me a little sad and disappointed. I mean, they are alright but not my favorite. The dough is just butter, cream cheese, flour and salt...like I said. Bland. The only flavoring is in the cinnamon sugar filling, but I don't think it's enough. The cookies comes out almost like a shortbread but softer because of the cream cheese I think. They are ok. Try them if you like. They come out looking really cute though! I got the recipe from a friend on Facebook but you can find it here at Good Housekeeping also.
Cinnamon Spirals

So for this holiday season try out some new cookie recipes and you might be surprised what you can make and how delicious they can be!

Eat, Drink and Merry Christmas!

-BellaRosa

December 13, 2010

Cajun Chicken Smashed Sammies


My Hubsie worked from home today due to the nasty weather out, which is even more fun for me because then I get to make a fun lunch! I usually am just making interesting and fun dinners, but for lunch it's always just leftovers or a can of soup or something. So today I decided to make some chicken sandwiches and potato oven-fries. They were really delicious!!

Cajun Chicken Smashed Sammies

2 boneless, skinless chicken breasts
4 slices thick-cut sourdough bread
Cajun seasoning (I use Wild Tree Cajun Blend)
2 slices cheese, whatever you prefer
Mayo

Season the chicken with the cajun spice rub and let sit in refrigerator for at least 15 minutes. Preheat oven to 350 degrees. Heat a skillet with olive oil over med-high heat. Add chicken top-side down and let brown on that side. Flip chicken over and let brown for a couple minutes. Transfer skillet to oven and let cook for 15-20 minutes until the chicken is fully cooked and juices run clear. Transfer chicken to cutting board and let rest.

Heat another pan over med heat. Cut your thick bread slices and spread butter on one side of each slice. Spread mayo on the other side of 2 pieces. Cut up the chicken into large cubes and place on the bottom piece of bread, butter side out. Add your cheese, I used pepper jack on one sammie and cheddar on the other, and top with bread spread with mayo.

Place sandwich in skillet and place another heavy pan on top to smash it down. Once browned and crispy, flip sandwich over and smash again with the other skillet. Remove sandwich once brown on second side and serve hot!

So...there is this place Melt near us and normally its a 2 hour wait just to be seated and then another hour and a half or so before you even get your food...I think I can totally rival them with my sammiches! I mean, no, they are not Melt, but just as good and made fresh and I think less greasy. And I could have added another slice of cheese and they would have been even better and gooey.

Also, please excuse my photos, the ONE place in my apartment I get the best light and take all my pictures currently has our Christmas tree, so my photos won't be very good for a little bit. But please enjoy the recipes and ideas!

Eat, Drink and Be Merry!

-BellaRosa

November 11, 2010

Harvest Biscotti


Ok, so I STILL had leftover canned pureed pumpkin...seriously. I shouldn't have bought the big can, but then again I couldn't have made all these extra pumpkin treats, so here it goes.

I've been thinking of making biscotti for a long time, since I am Italian and it is a classic Italian cookie, great with coffee or tea. Biscotti is a twice baked biscuit-like cookie that is baked as a log and then cut into the sliced cookies and baked again to make them nice and crisp. I was thinking, since it's my first year hosting Thanksgiving *panic* that it might be nice to have a little treat for my guest to take home after dinner. I wanted to test these out first to make sure they are good enough for company. So here goes nothing!

Harvest Biscotti

2 1/2 cups flour
1 cup brown sugar
1 tsp. baking powder
1 tsp. ground cinnamon
1/2 tsp. ground nutmeg
3/4 cup dried raisins and cranberries (Sun-Maid has these packaged together)
Pinch of salt
2 eggs
1/2 cup pumpkin puree
1 tsp. vanilla extract


Preheat oven to 350. Sift together the flour, brown sugar, baking powder, and spices. Add the raisins and cranberries and mix to incorporate thoroughly.

In a small bowl whisk together the eggs, pumpkin and vanilla extract. Pour the pumpkin mixture into the flour mixture. Give this a rough stir to generally combine ingredients, dough will be crumbly.

Flour our hands and a clean kitchen surface and lightly knead the dough. Lightly grease a baking sheet or line it with parchment paper. Form the dough into a large log, roughly 15-20 inches by 6-7 inches. The loaves should be relatively flat. Only about 1/2 inch high. Bake for 22-30 minutes at 350, until the center is firm to the touch. (you can also form 2 smaller logs, to make bite-size biscotti, change baking time to 18-25 minutes.)

Let the biscotti logs cool for 15 minutes, then using a serrated knife, cut into 1 inch thick pieces. Turn the oven to 300 and bake the biscotti pieces for 15-20 minutes. Cool completely.

Biscotti may still be a tad moist and chewy, so if you prefer the crispier biscotti let sit uncovered overnight in a dry space. Serve and enjoy!

(recipe adapted from Simply Recipes)

I choose to do the two smaller logs to have smaller biscotti, but I think I might like to have the larger ones for my guests (my guests being my parents, in-laws, my eldest brother and my youngest brother's family.) These are pretty tasty, and I really like the soft texture of the raisins and cranberries in the crisp and crumbly biscuit cookie. I think even adding nuts for crunch and a salty taste would be great as well. These were really easy to make and I think that my guest will really enjoy them as a take-home treat!

Eat, Drink and Be Merry!!

-BellaRosa

November 2, 2010

Pumpkin Cinnamon Streusel Rolls


I had leftover pumpkin from when I made my pumpkin cream cheese muffins and I knew i had to use it up so it didn't go bad, but I hadn't been inspired by anything, and I didn't want to make muffins again. So I started peeking around online and found an amazing idea. Pumpkin cinnamon rolls! What could be better?! So here's the recipe I found and I hope you enjoy!

Pumpkin Cinnamon Streusel Rolls
(find original recipe here.)

1 package dry yeast (about 2 1/4 teaspoons)
1/4 cup warm water
2 3/4 cup all-purpose flour, divided
1/2 cup canned pumpkin puree
1/2 cup milk
1/4 cup butter, melted
1 T granulated sugar
1 1/4 tsp. salt
1/4 tsp. nutmeg
Cooking Spray
3 T granulated sugar
3 T brown sugar
2 T flour
1 1/2 tsp. cinnamon
2 T chilled butter, cut into small pieces

Glaze:
3/4 cup powered sugar
1 T hot water
1/4 tsp. vanilla extract

To prepare the buns, dissolve yeast in warm water in a large bowl; let stand for 5 minutes. Lightly spoon flour into dry measuring cups, and level with a knife. Add 2 cups flour, pumpkin, and next 5 ingredients (pumpkin through nutmeg); beat with a mixer at medium speed until smooth. Turn dough out onto a floured surface. Knead until smooth and elastic (about 10 minutes); add enough of the remaining 3/4 cup flour, 1 tablespoon at a time, to prevent dough from sticking to hands (dough will feel tacky).

Place the dough in a large bowl coated with cooking spray, turning to coat top. Cover and let rise in a warm place (85°), free from drafts, for 45 minutes or until doubled in size. (Press two fingers into the dough. If an indentation remains, the dough has risen enough.)

Combine 3 tablespoons granulated sugar, brown sugar, 2 tablespoons flour, and cinnamon in a small bowl. Cut in butter with a pastry blender or 2 knives until mixture resembles coarse meal.

Punch dough down; cover and let rest for 5 minutes. Roll the dough into a 12 x 10-inch rectangle on a floured surface. Sprinkle with brown sugar mixture. Roll up the rectangle tightly, starting with a long edge, pressing firmly to eliminate air pockets; pinch seam and ends to seal. Cut roll into 12 (1-inch) slices. Place slices in a 9-inch square baking pan coated with cooking spray. Cover and let rise 25 minutes or until doubled in size.

Preheat oven to 375°.

Bake the rolls at 375° for 20 minutes or until golden brown. Cool for 15 minutes in pan on a wire rack.

To prepare the glaze, combine the powdered sugar, 1 tablespoon water, and vanilla extract in a small bowl, stirring with a whisk until smooth. Drizzle glaze over buns. Serve warm.

These cinnamon rolls came out great! They were quite easy to make. The longest process was letting the dough rise and then letting the rolls proof once in the pan, but besides that, I felt they were super simple to make. These don't have much of a pumpkin flavor as I expected but there is only 1/2 a cup of pumpkin in them, but they have a nice spice and flavor to them. The pumpkin gives these a lovely orangey color. They are really moist and the cinnamon sugar filling is really delicious. I think these are totally worth the effort and they are really, really good!!! Perfect for a nice fall morning, to go with your cup of coffee or tea.

Fresh out of the oven, waiting for the glaze

Eat, Drink and Be Merry!

-BellaRosa

October 27, 2010

Recommended Reading: By The Time You Read This I'll Be Dead

I haven't done one of these in a really long time, I guess I hadn't been reading anything that really struck a cord or that I thought you guys would enjoy as well. But this book really hit me, and I really, really love this book. Even though it's a pretty sad and depressing story, I really loved it...it makes you think.

This book tells the story of Daelyn and her stuggles with every day life, with her parents on 24/7 suicide watch over her after her 3 (or more) failed suicide attempts. This last one leaving her mute and having to wear a neck brace all the time. She is considered a "freak" at school and feels very alone and worthless. She has horrible things happen to her and you might feel the same after what this girl has went through. But then again maybe with a better support system from her parents she might not of felt the way she did...but who knows. Either she isn't communicating properly or her parents just don't know how to listen.


Daelyn finds a website dedicated to "completers", those who will finally off themselves...for the last time. No more failures. She finds comfort in knowing that no one is gonna talk her out of it on this site and its there to help these people tell their stories and vent frustrations.


There is a twist when this random boy comes up to her one day, while waiting for her mother to pick her up from school, and starts chatting with her. He's very persistent and is there everyday to meet her and talk with her...but does she have the ability to let someone in, even though her "date of determination" is only 23 days away?


This book kept me enticed all the way through. I was invested in the character. I wanted to yell at her, I wanted to hug her, I wanted to be her friend. I wanted to tell her everything was ok...
Emotional charged and pulling on heartstrings, this book is a winner.


And I don't know what my view is on the whole "bullying" situation, but I am glad this book is out there to show what it can do to someone's life...when the bullying is day in and day out, no matter where they may move or what new school they go to...it really makes you think.

-BellaRosa

October 19, 2010

Pumpkin Cream Cheese Streusel Muffins


Its that time...time for my famous pumpkin muffins!!! I changed it up a bit this year and put together a mish-mosh of 2 different recipes that I have come across and my own little twist. These muffins are packed with everything fall! They are moist, flavorful and just make you feel happy when you eat them.

Minis ready to be devoured

Pumpkin Cream Cheese Streusel Muffins
Makes 12 regular muffins (original says 24 I got 12) or 48 mini-muffins

1 3/4 cup flour
1 tsp. baking soda
1/2 tsp. salt
1/2 tablespoon cinnamon
1 tsp. nutmeg
1 cup brown sugar
1/2 cup granulated sugar
1/2 cup vegetable oil
1/3 cup water
1 cup canned pumpkin
2 eggs
1 tsp. vanilla extract

Filling:
1 8-ounce package cream cheese (I used 1/3 fat free)
3 tablespoons brown sugar
1/4 tsp. cinnamon
1/2 tsp. vanilla extract

Streusel:
1/3 cup brown sugar
2 tablespoons flour
1/8 tsp. cinnamon
1 1/2 tablespoons cold butter, cut into small pieces


Preheat oven to 350 degrees. Line or grease your muffin tin and set aside.

1. In a medium bowl whisk together the flour, baking soda, salt, cinnamon and nutmeg. Set aside.

2. In a large bowl whisk together the brown sugar, granulated sugar, oil, water, pumpkin, eggs and vanilla. Whisk until combined and smooth.

3. Slowly stir in flour mixture to wet ingredients. Mix until just combined.

For the filling:

Beat the cream cheese until softened. Beat in the brown sugar, cinnamon and vanilla until all ingredients are incorporated. Set aside.

For the streusel topping:

In a bowl combine the brown sugar, cinnamon and flour. With your hands mix in the butter until the mixture resembles coarse crumbs.

4. Fill muffins tins about 1/3 of the way full with the pumpkin batter. Add a good dollop of cream cheese to the center of each one. Fill the tins about 3/4 full and top with streusel topping.

5. Bake at 350 degrees for 15-18 minutes for regular muffins and 10 minutes for minis, or until a toothpick inserted comes out clean. Place muffins tins on wire racks for cooling. Remove from tins and enjoy!

(Took bits and pieces from Two Peas and Their Pod and the streusel from GroupRecipes)


These...are...amazing. They are so good!! I am so glad I tinkered around with a few different recipes to make something so good and truly delicious! I sort of just went by what I had I hand and what I could do with what I had. I am really glad I found how to bake the cream cheese right into the muffins, cause I used to pipe them into the bottoms and it was a pain and I felt like you never got quite enough.

And not only is the cream cheese amazing but that slightly crunchy and sweet brown sugar topping is awesome. I think it makes the whole muffin! And the muffins itself, when you don't get a bite of cream cheese is delicious and moist. Very flavorful and light.


These muffins are a winner!! You must make these for a fall gathering or for your neighbor or someone you love, or just for yourself. They are that good!

Eat, Drink and Be Merry ~Happy Autumn~

-BellaRosa

October 11, 2010

Cheesy Potato Broccoli Soup with Crispy Proscuitto


I was clicking through the food blog The Craving Chronicles and came across this amazing soup recipe that was cheesy and hearty and full of good stuff. The original recipe didn't have broccoli, but I had some cooked, and leftover so I threw that in and I thought it was perfect. The crispy proscuitto on top, definitely makes the whole dish!! You need that salty bite with the cheese and potatoes, its absolutely delicious! This soup is a gonna be a new fall favorite!

I'm in love with these huge soup mugs!

Cheesy Potato Broccoli Soup with Crispy Proscuitto
(original recipe found here.)

4-6 slices proscuitto
1 medium onion, diced
2-3 carrots, sliced
1 lb. approx. red potatoes (10-12 small or 4-6 large) peeled and cubed
1 qt. box chicken broth or stock
3 tablespoons butter
3 tablespoons flour
2 cups milk
2 cups shredded cheddar cheese
salt and pepper to taste

Preheat oven to 400. Place slices of proscuitto on a lightly greased or Silpat lined sheet pan. Bake for about 10 minutes, until crisp. Set aside to cool, and then break into crumbles.

Heat olive oil in a large soup pot. Add onion and carrots and saute until softened, about 5 minutes. Add potatoes and enough stock to just cover and bring to a boil. Cook until potatoes are tender, about 20 minutes.

While the potatoes are cooking, melt 3 T butter in a saucepan over medium-low heat. Once melted add 3 T flour and whisk to form a roux. Allow to cook, 1 minute. Add the milk slowly, whisking constantly to smooth out any lumps. Continue to heat while whisking until the mixture thickens, about 5 minutes. Once it reaches desired thickness, remove from heat and stir in your grated cheese.

Once potatoes are tender, pour the cheese mixture into the potato mixture, stirring to combine. Heat to a simmer and let thicken. Season with salt and pepper to taste. Top each bowl of soup with crumbled prosciutto and enjoy!

Warm, cheesy goodness for a Fall day

One big, soup mug full of this soup was enough for a good meal! Add some bread to dunk and I'm sure it's even better, and more satisfying! The Hubs added oyster crackers, which are delicious and great with soup as well. This soup of full of hearty potatoes and veggies and feels good in your soul. It was super easy to make...like, incredibly easy! You dirty 2 pots, but its ok cause the soup is so yummy! The potatoes are nice and tender and the carrots still have crunch and the broccoli adds nice color and flavor, all around a great bowl of soup. The best part is the prosciutto on top...so crispy and salty, I am in love! I love prosciutto when its not crispy, and I like this crispy topping rather than bacon, I would choose prosciutto any day!

Hey! Don't take that yet!

Eat, Drink and Be Merry...and warm up with a bowl of soup!

-BellaRosa

Banana Oatmeal Cookies

I came across a banana oatmeal cookie recipe a couple weeks back and thought that those sounded amazing! I love, love, love oatmeal cookies, and I love baking with bananas so it seemed win/win for me! I looked up a few more recipes and found one that seemed perfect and thought I'd give it a try since I have some overly ripe bananas chilling on my counter.

Banana Oatmeal Cookies
(adapted from this recipe.)

1 1/2 cups flour
3/4 cup brown sugar
1/4 white sugar
1/2 tsp. baking soda
1/2 tsp. cinnamon
1/2 tsp. nutmeg
3/4 cup (1 1/2 sticks) butter, softened
1 egg
1 cup banana, mashed (about 2)
1 3/4 cups old-fashioned oats

Optional:
1 cup chocolate chips
1/2 cup chopped nuts

In a bowl, combine the flour, sugars, baking soda, cinnamon, and nutmeg. Beat in the butter until the mixture resembles coarse crumbs. Beat in egg and bananas. Stir in the oats and chocolate chips or nuts if using them.

Drop by tablespoonfuls onto greased cookie sheets. Bake at 375 degrees for 12-15 minutes, or until golden brown. Cool on wire racks.


These soft, dense, flavorful cookies are great!! Really easy to make, although the whole, combining the sugar with the flour and THEN beating in the butter, was a little weird, but whatever, maybe that is why they are kinda thick and cakey. Also, I decided to go with brown sugar instead of all white sugar, because, well, I just like it more and I think that caramel-y flavor you get with brown sugar goes perfect with bananas. Also, to the last bit of batter I added a small handful of hazelnuts to see how those turned out. I think the nuts needed to be in bigger chunks, but I like the taste and texture of nuts in oatmeal cookies.

I hope you get inspired by these delicious cookies and use up some over-ripe bananas you may have sitting on your counter.

Eat, Drink and Be Merry!

-BellaRosa